Ordering, Sizing, Wearing Guidelines
Hi, I'm Ernie with Natural Foot Orthotics, and I'd like to congratulate you on the purchase of your new orthotics.
This video is designed to help you get started off correctly to assure your success with these amazing orthotics. So things that I'd like to discuss are:
- Making sure you purchased the proper orthotic that is right for you.
- Checking your size.
- Setting them up properly in your shoes.
- The break in period.
The Right Stabilizer Orthotic For You
So you probably know we offer two styles of orthotics:
- The Original Stabilizer is designed for medium to high arches.
- The Slim Stabilizer is for lower arches.
If you're not sure about your arch height, I would recommend starting off with the Original Stabilizer.
Here's a diagram showing you the different arch height:

Foot Sizing For Stabilizer Orthotics
Okay, let's check your sizing.
Sizing Method 1.
First of all, place your heel in the heel cup.
The leading edge of the Orthotic should follow the contour of your arch and fall just short of the ball of the foot.
The ball of the foot is right here:
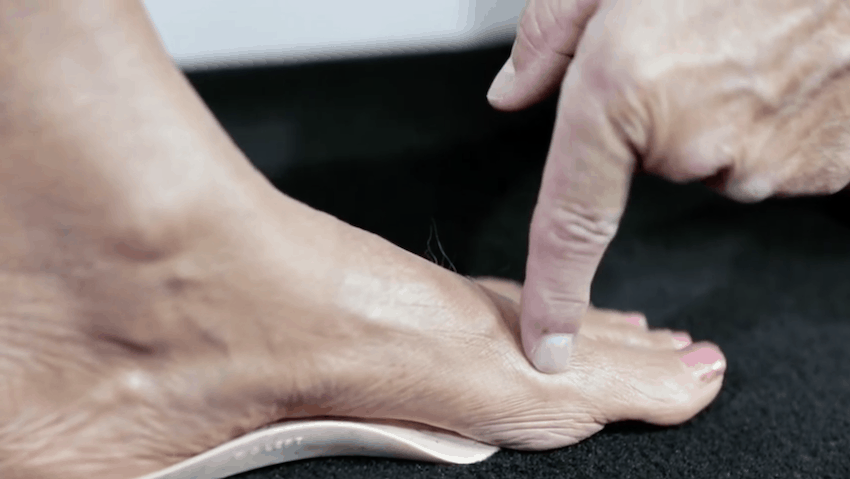
This is your ideal sizing.
Sizing Method 2
Another way to check your sizing is to go ahead and put them into your shoes.
Make sure you place them all the way to the rear of the shoe, then stand up.
You should feel the support about in the center of your arch from front to back.
Like this:

If you feel the support closer to the heel, that means they're too short.
If you feel them up underneath the ball of the foot, then they're too long.
So for sizing, it's pretty straightforward.
Correctly Placing Stabilizer Orthotics In Your Shoes
Now let's set them up in your shoes.
Keep in mind, orthotics are going to work best on a flat surface, and what I mean by that is if you put them into a shoe that already has a lot of support, it will distort the shape of the orthotic dramatically.
Most shoes have a removable foot bed, so let's lift up the foot bed and place your orthotic in:

Make sure you slide it all the way to the rear and lay the foot bed back in place.
This will give you a little cushioning between your foot and the orthotic. By the way, we also sell our Natural Sponge Rover Cushions for this purpose.
They are 3/16ths thick, made of natural sponge rubber with a nylon covering. Very comfortable and durable.
These will also help during the break in period, but they are not a must have item.
Have Non-Removable Foot Beds?
Some shoes, of course, do not have a removable foot bed, so the orthotics will just have to rest on top of the foot bed.
The Slim Stabilizer tends to work better in dress shoes because they are thinner and lighter.
As for myself, I actually where both styles of Stabilizer Orthotic Insoles. It just depends on the activity and the footwear.
Stabilizer Break-In Period
Now let's talk about the break-in period.
This can vary from person to person and which orthotic you purchased. The original stabilizer is very aggressive and generally takes about two weeks for that break in period.
It may initially feel like you're standing on a bit of a golf ball, but that's okay.
Your body will adjust to that feeling, so make sure you adhere to the wearing guidelines and flow.
- So start off wearing them no more than 1 hour the first day.
- 2 hours the second day
- 3 hours the third day, and so forth.
To expedite the break in period, you could start wearing them for an hour in the morning and then an hour in the afternoon and so forth.
For example, on the fourth day, you may need to wear them for 4 hours a day for two to three days until you think you can move on with the break in period.
View our Stabilizer Orthotics Break-In Wearing Guide Here that shows these suggested time periods to break them in.
The main thing is that you take it easy with the break in period, even if you're already used to wearing orthotics.
It's a slow and easy process that pays big dividends.
Also, keep in mind, there's a lot going on here.
You have 26 bones in each foot, and four arches in each foot. These orthotics are actually shaping the foot and re-establishing those arches.
You will stand differently.
Use muscles differently.
Be patient as your body goes through these changes.
Ask yourself:
- Are you standing a little taller?
- Are your shoulders further back?
- Do you feel more stable?
- Are you walking more heel to toe?
Remember, your feet are the foundation of your entire body.
They only make up 2% of your body mass. That is why orthotics are so important.
Today's modern shoes just don't have the support we need.
Now, with the Slim Stabilizer orthotic, it should have a little less break-in period because they are a little less aggressive.
You can start wearing them two to 3 hours the first day and so forth with the same results.
Hopefully this video will answer most of your questions.
You can view our Most Frequently Asked Questions here to see if any more of your questions already has an answer waiting for you.
For any reason or concerns you have about your orthotics, please feel free to contact us directly.
We are more than happy to help you through this process and to assure your success, and that you are completely satisfied.
Keep in mind, we offer free exchanges on orthotics for up to 30 days.
So if you think you need a stronger or milder orthotic, or different size, just email us or contact us direct.
And don't forget to register your orthotics on our website for your lifetime warranty.
When you do so, you will also receive a lifetime membership with lifetime discounts on all future orders. This is just one way we can show our appreciation to our valued customers.
If you love your orthotics and shopping experience, please feel free to leave us a review.
Thank you so much for watching and reading our Ordering, Sizing & Wearing Guidelines, and we look forward to helping you and your loved ones with our Stabilizer Orthotics.